
Visual Studio Code (VS Code) is a powerful, lightweight code editor that’s popular among developers. If you are new to Python development and want to use VS Code as your primary code editor, this tutorial will guide you through the process of installing Python packages in VS Code. Let’s get started!
Install Python Packages in Visual Studio Code
Now, let us see how to install Python packages in Visual Studio Code.
Prerequisites
Before we begin, make sure you have the following installed on your machine:
- Python: Download and install the latest version of Python from the official Python website.
- Visual Studio Code: Download and install VS Code from the official VS Code website.
Step 1: Install Python Extension for VS Code
The first step is to install the Python extension for VS Code, which provides rich support for the Python language.
- Open VS Code.
- Go to the Extensions view by clicking on the Extensions icon in the Activity Bar on the side of the window or by pressing
Ctrl+Shift+X. - In the search bar, type
Pythonand select the extension provided by Microsoft. - Click the
Installbutton.
This extension will provide features like IntelliSense, linting, debugging, and more.
You can see the screenshot below for your reference:

Step 2: Set Up a Python Environment
It’s a good practice to use a virtual environment for your Python projects. A virtual environment is an isolated environment that allows you to manage dependencies for different projects separately.
- Open the terminal in VS Code by selecting
View>Terminalor pressingCtrl+`. - Navigate to your project directory using the
cdcommand. - Create a virtual environment by running the following command:
python -m venv myenvReplace myenv with the name you prefer for your virtual environment.
- Activate the virtual environment:
- On Windows:
sh .\myenv\Scripts\activate - On macOS and Linux:
sh source myenv/bin/activate
You should see (myenv) at the beginning of your terminal prompt, indicating that the virtual environment is active.
Step 3: Install Python Packages
Now that your virtual environment is set up, you can install Python packages using pip, which is the package installer for Python.
- In the terminal, ensure your virtual environment is active.
- To install a package, use the following command:
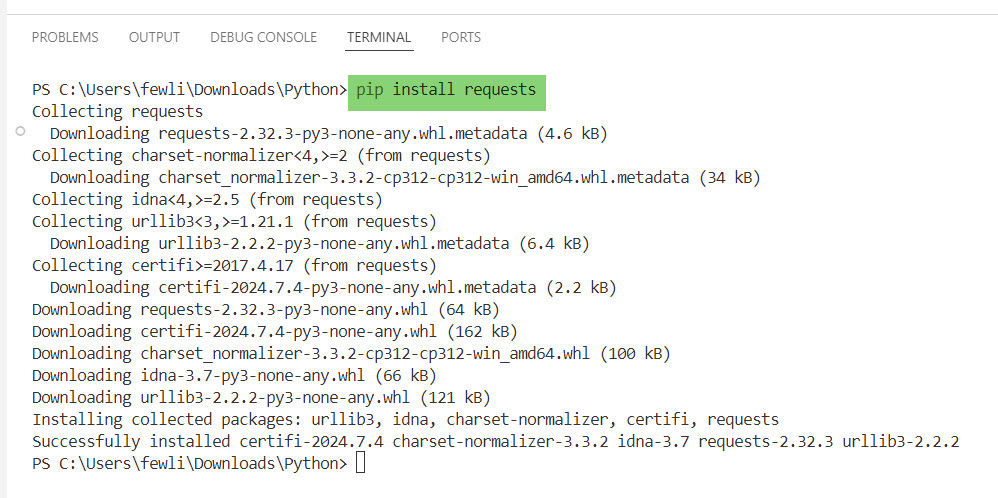
pip install package_nameReplace package_name with the name of the package you want to install. For example, to install the requests package, you would run:
pip install requestsYou can see the screenshot below; I ran the above command.
- To verify the installation, you can list the installed packages by running:
pip listStep 4: Managing Python Packages
You can also manage your Python packages directly from VS Code:
- Open the Command Palette by pressing
Ctrl+Shift+P. - Type
Python: Select Interpreterand select the interpreter from your virtual environment. - To install additional packages, you can use the integrated terminal or add them to a
requirements.txtfile and run:
pip install -r requirements.txtStep 5: Writing and Running Python Code
With your environment set up and packages installed, you can now write and run your Python code in VS Code.
- Create a new Python file by selecting
File>New Fileand saving it with a.pyextension. - Write your Python code in the editor.
- To run your code, right-click in the editor and select
Run Python File in Terminalor simply pressF5to start debugging.
Conclusion
Congratulations! You have successfully set up Python in Visual Studio Code, created a virtual environment, and installed Python packages. I hope, if you are a beginner, this tutorial will be helpful to you in installing Python packages in Visual Studio Code.
You may also like:
- How to Set Up the Development Environment for Python?
- How to Install a Python Package from GitHub?
- How to Install Multiple Versions of Python?
- How to Install a Specific Version of a Package in Python?

I’m Michelle Gallagher, a Senior Python Developer at Lumenalta based in New York, United States. I have over nine years of experience in the field of Python development, machine learning, and artificial intelligence. My expertise lies in Python and its extensive ecosystem of libraries and frameworks. Throughout my career, I’ve had the pleasure of working on a variety of projects that have leveraged my skills in Python and machine learning. Read more…